


 该文指导如何在ROSNoetic环境下安装相关功能包,如USB-CAM、cameracalibration和imageprocessing工具。接着,它展示了如何在URDF文件中添加相机传感器,包括设置固定关节和调整参数。之后,通过运行gazebo.launch启动模拟环境,并查看发布的话题列表。最后,利用rqt_image_view显示相机捕获的图像,从而验证配置成功。
1、安装功能包
sudo apt install ros-noetic-usb-cam ros-noetic-camera-calibration ros-noetic-image-view ros-noetic-image-proc
2、urdf文件,参考官网添加相应的相机传感器这里
  <link name="camera_link">      <!---这里的名称要注意>
        <visual>
            <origin xyz=" 0 0 0 " rpy="0 0 0" />
            <geometry>

                <box size="0.03 0.04 0.04" />

            </geometry>
            <material name="red">
                <color rgba="0 0 0 0.95"/>
            </material>
        </visual>
    </link>

    <joint name="camera_joint" type="fixed">
        <origin xyz="0.0 0.05 0.0" rpy="0 0 1.57"/>  <!---这里根据摄像头的位置进行改变,1.57就是90°>
        <parent link="wrist_3_link"/>
        <child link="camera_link"/>
    </joint>
      <!-- camera -->
 <gazebo reference="${link_name}">   <!---这里的名称要和link一致>
  <sensor name="${link_name}_camera" type="depth">
    <update_rate>20</update_rate>
    <camera>
      <horizontal_fov>1.047198</horizontal_fov>
      <image>
        <width>640</width>
        <height>480</height>
        <format>R8G8B8</format>
      </image>
      <clip>
        <near>0.05</near>
        <far>3</far>
      </clip>
    </camera>
    <plugin name="${link_name}_controller" filename="libgazebo_ros_openni_kinect.so">
      <baseline>0.2</baseline>
      <alwaysOn>true</alwaysOn>
      <updateRate>1.0</updateRate>
      <cameraName>${camera_name}_ir</cameraName>  <!---这里名称可以随便命名,但是下面的五个${camera_name}要和这里的一致>
      <imageTopicName>/${camera_name}/color/image_raw</imageTopicName>
      <cameraInfoTopicName>/${camera_name}/color/camera_info</cameraInfoTopicName>
      <depthImageTopicName>/${camera_name}/depth/image_raw</depthImageTopicName>
      <depthImageInfoTopicName>/${camera_name}/depth/camera_info</depthImageInfoTopicName>
      <pointCloudTopicName>/${camera_name}/depth/points</pointCloudTopicName>
      <frameName>${frame_name}</frameName>   <!---这里的名称要和link一致>
      <pointCloudCutoff>0.5</pointCloudCutoff>
      <pointCloudCutoffMax>3.0</pointCloudCutoffMax>
      <distortionK1>0.00000001</distortionK1>
      <distortionK2>0.00000001</distortionK2>
      <distortionK3>0.00000001</distortionK3>
      <distortionT1>0.00000001</distortionT1>
      <distortionT2>0.00000001</distortionT2>
      <CxPrime>0</CxPrime>
      <Cx>0</Cx>
      <Cy>0</Cy>
      <focalLength>0</focalLength>
      <hackBaseline>0</hackBaseline>
    </plugin>
  </sensor>
</gazebo>
ps,我这部分代码如下
<link name="camera_link">
        <visual>
            <origin xyz=" 0 0 0 " rpy="0 0 0" />
            <geometry>

                <sphere radius="0.005" />

            </geometry>
            <material name="red">
                <color rgba="0 0 0 0.95"/>
            </material>
        </visual>
    </link>

    <joint name="camera_joint" type="fixed">
        <origin xyz="0.0 0.05 0.0" rpy="0 0 1.57"/>
        <parent link="wrist_3_link"/>
        <child link="camera_link"/>
    </joint>
    <gazebo reference="camera_link">
  <sensor name="camera_depth" type="depth">
    <update_rate>20</update_rate>
    <camera>
      <horizontal_fov>1.047198</horizontal_fov>
      <image>
        <width>640</width>
        <height>480</height>
        <format>R8G8B8</format>
      </image>
      <clip>
        <near>0.05</near>
        <far>3</far>
      </clip>
    </camera>
    <plugin name="camera_controller" filename="libgazebo_ros_openni_kinect.so">
      <baseline>0.2</baseline>
      <alwaysOn>true</alwaysOn>
      <updateRate>1.0</updateRate>
      <cameraName>camera</cameraName>
      <imageTopicName>/camera/color/image_raw</imageTopicName>
      <cameraInfoTopicName>/camera/color/camera_info</cameraInfoTopicName>
      <depthImageTopicName>/camera/depth/image_raw</depthImageTopicName>
      <depthImageInfoTopicName>/camera/depth/camera_info</depthImageInfoTopicName>
      <pointCloudTopicName>/camera/depth/points</pointCloudTopicName>
      <frameName>camera_link</frameName>
      <pointCloudCutoff>0.5</pointCloudCutoff>
      <pointCloudCutoffMax>3.0</pointCloudCutoffMax>
      <distortionK1>0.00000001</distortionK1>
      <distortionK2>0.00000001</distortionK2>
      <distortionK3>0.00000001</distortionK3>
      <distortionT1>0.00000001</distortionT1>
      <distortionT2>0.00000001</distortionT2>
      <CxPrime>0</CxPrime>
      <Cx>0</Cx>
      <Cy>0</Cy>
      <focalLength>0</focalLength>
      <hackBaseline>0</hackBaseline>
    </plugin>
  </sensor>
</gazebo>
3、运行
roslaunch Gluon_moveit_config gazebo.launch
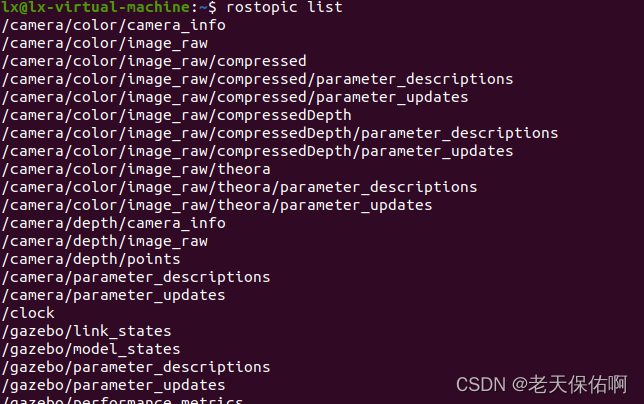
4、运行
rostopic list
可以看到相关的话题发布
5、运行
rqt_image_view
可以看到相机的捕获画面
6、最终效果
gazebo的urdf添加相机


 1785
1785

 被折叠的 条评论
为什么被折叠?
被折叠的 条评论
为什么被折叠?
 到【灌水乐园】发言


