


https://docs.unity3d.com/ScriptReference/Rendering.CommandBuffer.html
Descritption
list of graphics commands to exectue
command buffers holds list of rendering commands (set render target, draw mesh…). they can be set to execute at various points during camera rendering (see Camera.AddCommandBuffer), light rendering (see Light.AddCommandBuffer) or be executed immediately (see Graphics.ExecuteCommandBuffer).
typically they would be used to extend unity’s rendering pipeline in some custom ways. for example, u could render some additional objects into deferred rendering g-buffer after all regular objects are done, or do custom processing of light shadow maps. See command buffers overview page for more details. https://docs.unity3d.com/Manual/GraphicsCommandBuffers.html
Command buffers can be created and then executed many times if needed.
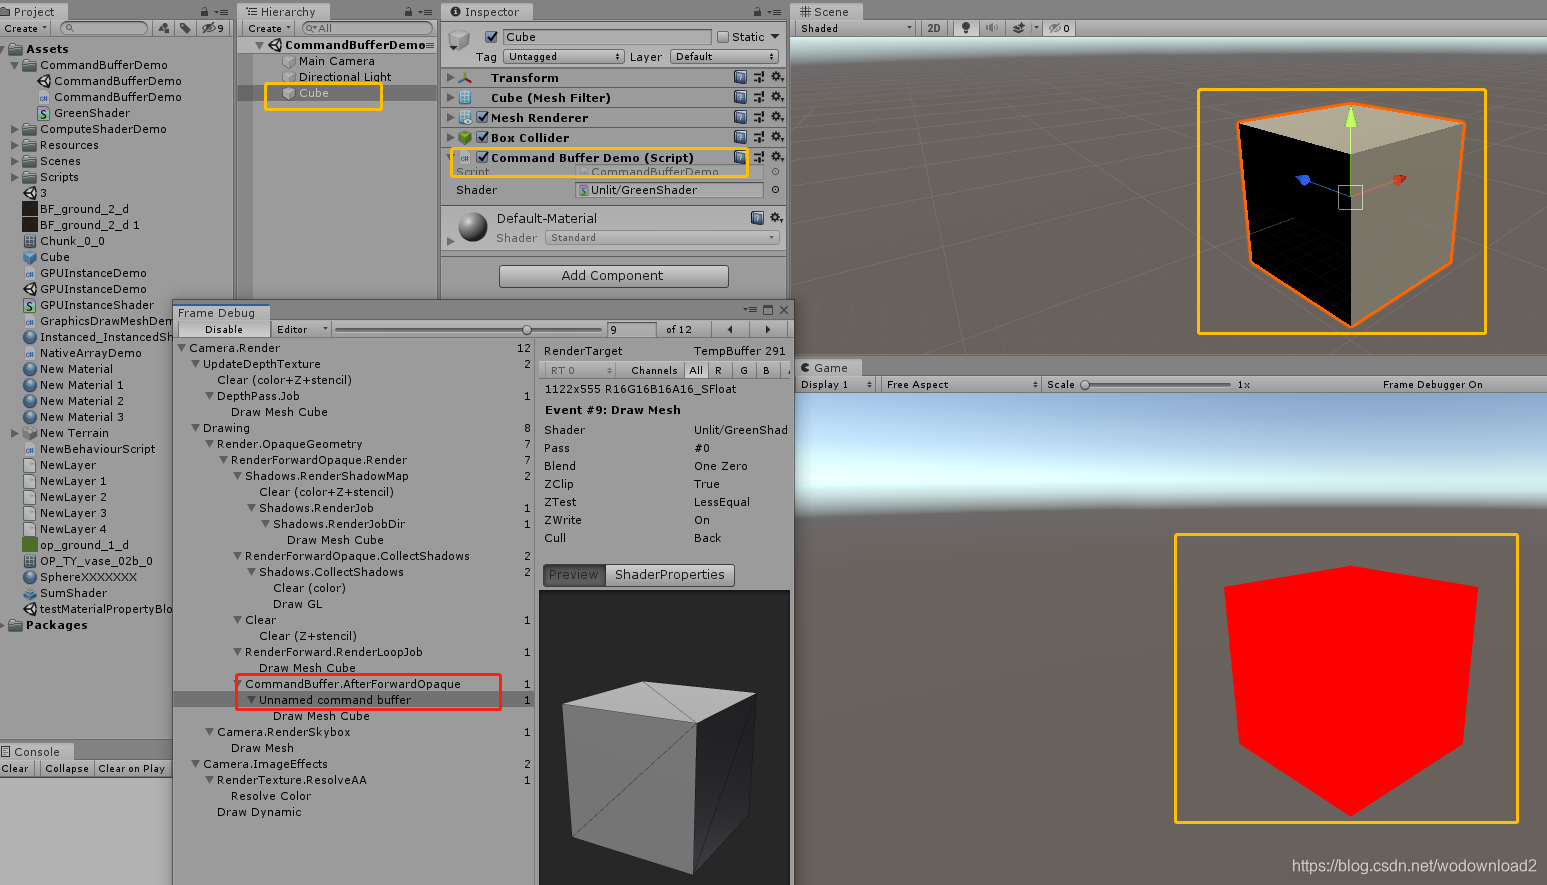
举例:https://blog.csdn.net/u012740992/article/details/88795640
Shader "Unlit/GreenShader"
{
    Properties
    {
		_MainColor("MainColor",color) = (1,0,0,1)
    }
    SubShader
    {
        Tags { "RenderType"="Opaque" }
        Pass
        {
            CGPROGRAM
            #pragma vertex vert
            #pragma fragment frag

            #include "UnityCG.cginc"

            struct appdata
            {
                float4 vertex : POSITION;
            };

            struct v2f
            {
                float4 vertex : SV_POSITION;
            };

			fixed4 _MainColor;

            v2f vert (appdata v)
            {
                v2f o;
                o.vertex = UnityObjectToClipPos(v.vertex);
                return o;
            }

            fixed4 frag (v2f i) : SV_Target
            {
                return _MainColor;
            }
            ENDCG
        }
    }
}
脚本:
using UnityEngine;
using UnityEngine.Rendering;

public class CommandBufferDemo : MonoBehaviour
{
    public Shader shader;
    private void OnEnable()
    {
        CommandBuffer buf = new CommandBuffer();
        buf.DrawRenderer(GetComponent<Renderer>(), new Material(shader));
        Camera.main.AddCommandBuffer(CameraEvent.AfterForwardOpaque, buf);
    }
}
解读这个例子:https://docs.unity3d.com/Manual/GraphicsCommandBuffers.html

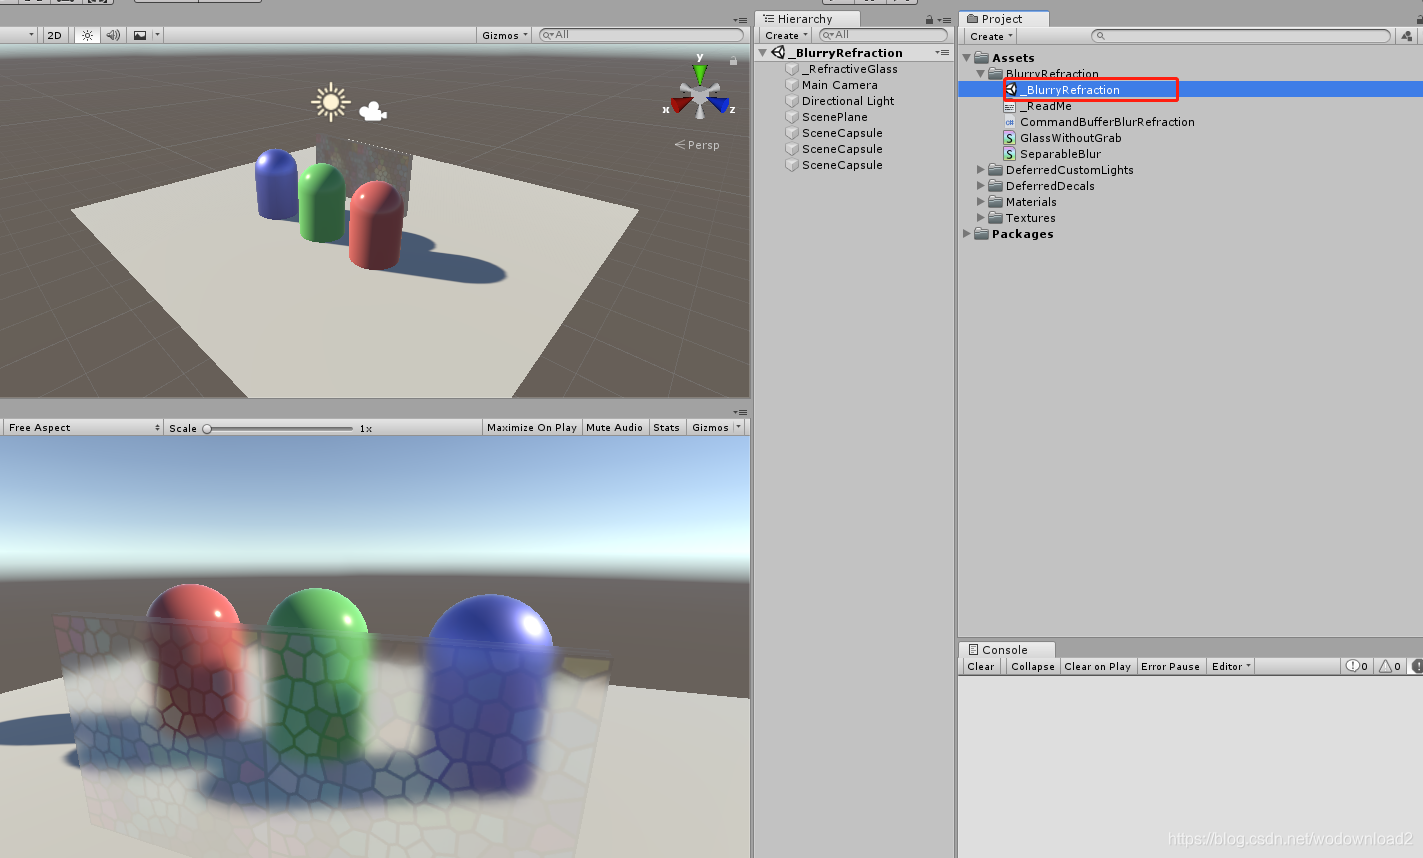
看这个例子:_BlurryRefraction
this scene shows a very basic “blurry refraction 折射” technique using command buffers.
the idea is: after opaque objects & skybox is rendered, copy the image into a temporary render target, blur it and set up a global shader property with the result. objects that are rendered after skybox (i.e. all semitrasparent objects) can then sample this “blurred scene image”. this is like GrabPas, just a bit better!
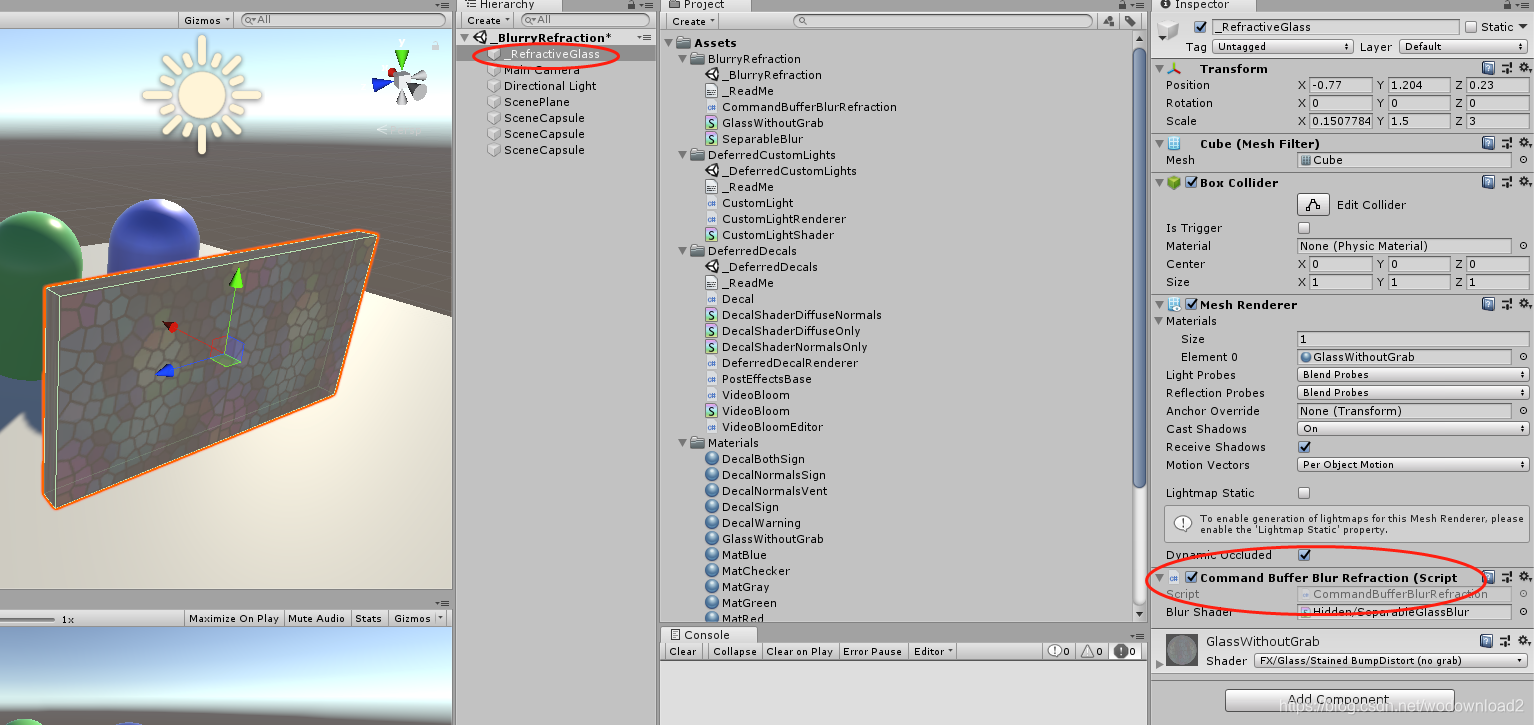
See CommandBufferBlurRefraction.cs script that is attached to the glass object
in the scene.
Caveat: right now it does not capture the scene view properly though; the
texture ends up only containing the skybox 😦
Caveat: this is small example code, and not a production-ready refractive
blurred glass system. It very likely won’t deal with multiple objects having
the script attached to them, etc.
准备工作:
// Whenever any camera will render us, add a command buffer to do the work on it
public void OnWillRenderObject()
{
	var act = gameObject.activeInHierarchy && enabled;
	if (!act)
	{
		Cleanup();
		return;
	}

	var cam = Camera.current;
	if (!cam)
		return;

	CommandBuffer buf = null;
	// Did we already add the command buffer on this camera? Nothing to do then.
	if (m_Cameras.ContainsKey(cam))
		return;
创建一个材质:
if (!m_Material)
{
	m_Material = new Material(m_BlurShader);
	m_Material.hideFlags = HideFlags.HideAndDontSave;
}
为当前的相机创建一个buffer:
buf = new CommandBuffer();
buf.name = "Grab screen and blur";
m_Cameras[cam] = buf;
new一个buffer,命名一个name,存在字典里。
拷贝屏幕图片到rt
https://zhuanlan.zhihu.com/p/26142011

// copy screen into temporary RT
int screenCopyID = Shader.PropertyToID("_ScreenCopyTexture");
buf.GetTemporaryRT (screenCopyID, -1, -1, 0, FilterMode.Bilinear);
buf.Blit (BuiltinRenderTextureType.CurrentActive, screenCopyID);
找ID、申请缓冲、拷贝。src->dest
		// get two smaller RTs
		int blurredID = Shader.PropertyToID("_Temp1");
		int blurredID2 = Shader.PropertyToID("_Temp2");
		buf.GetTemporaryRT (blurredID, -2, -2, 0, FilterMode.Bilinear);
		buf.GetTemporaryRT (blurredID2, -2, -2, 0, FilterMode.Bilinear);

		// downsample screen copy into smaller RT, release screen RT
		buf.Blit (screenCopyID, blurredID);
		buf.ReleaseTemporaryRT (screenCopyID);

		// horizontal blur
		buf.SetGlobalVector("offsets", new Vector4(2.0f/Screen.width,0,0,0));
		buf.Blit (blurredID, blurredID2, m_Material);
		// vertical blur
		buf.SetGlobalVector("offsets", new Vector4(0,2.0f/Screen.height,0,0));
		buf.Blit (blurredID2, blurredID, m_Material);
		// horizontal blur
		buf.SetGlobalVector("offsets", new Vector4(4.0f/Screen.width,0,0,0));
		buf.Blit (blurredID, blurredID2, m_Material);
		// vertical blur
		buf.SetGlobalVector("offsets", new Vector4(0,4.0f/Screen.height,0,0));
		buf.Blit (blurredID2, blurredID, m_Material);

		buf.SetGlobalTexture("_GrabBlurTexture", blurredID);

		cam.AddCommandBuffer (CameraEvent.AfterSkybox, buf);
shader代码:
// Upgrade NOTE: replaced 'mul(UNITY_MATRIX_MVP,*)' with 'UnityObjectToClipPos(*)'

Shader "Hidden/SeparableGlassBlur"
{
	Properties
	{
		_MainTex ("Base (RGB)", 2D) = "" {}
	}

	CGINCLUDE
		#include "UnityCG.cginc"

		struct v2f {
			float4 pos : POSITION;
			float2 uv : TEXCOORD0;

			float4 uv01 : TEXCOORD1;
			float4 uv23 : TEXCOORD2;
			float4 uv45 : TEXCOORD3;
		};

		float4 offsets;
		sampler2D _MainTex;

		v2f vert (appdata_img v)
		{
			v2f o;
			o.pos = UnityObjectToClipPos(v.vertex);
			o.uv.xy = v.texcoord.xy;
			o.uv01 =  v.texcoord.xyxy + offsets.xyxy * float4(1,1, -1,-1);
			o.uv23 =  v.texcoord.xyxy + offsets.xyxy * float4(1,1, -1,-1) * 2.0;
			o.uv45 =  v.texcoord.xyxy + offsets.xyxy * float4(1,1, -1,-1) * 3.0;
			return o;
		}

		half4 frag (v2f i) : COLOR
		{
			half4 color = float4 (0,0,0,0);
			color += 0.40 * tex2D (_MainTex, i.uv);
			color += 0.15 * tex2D (_MainTex, i.uv01.xy);
			color += 0.15 * tex2D (_MainTex, i.uv01.zw);
			color += 0.10 * tex2D (_MainTex, i.uv23.xy);
			color += 0.10 * tex2D (_MainTex, i.uv23.zw);
			color += 0.05 * tex2D (_MainTex, i.uv45.xy);
			color += 0.05 * tex2D (_MainTex, i.uv45.zw);
			return color;
		}

	ENDCG

Subshader
{
	 Pass
	 {
		  ZTest Always Cull Off ZWrite Off
		  Fog { Mode off }

	      CGPROGRAM
	      #pragma fragmentoption ARB_precision_hint_fastest
	      #pragma vertex vert
	      #pragma fragment frag
	      ENDCG
	  }
}

Fallback off
} // shader
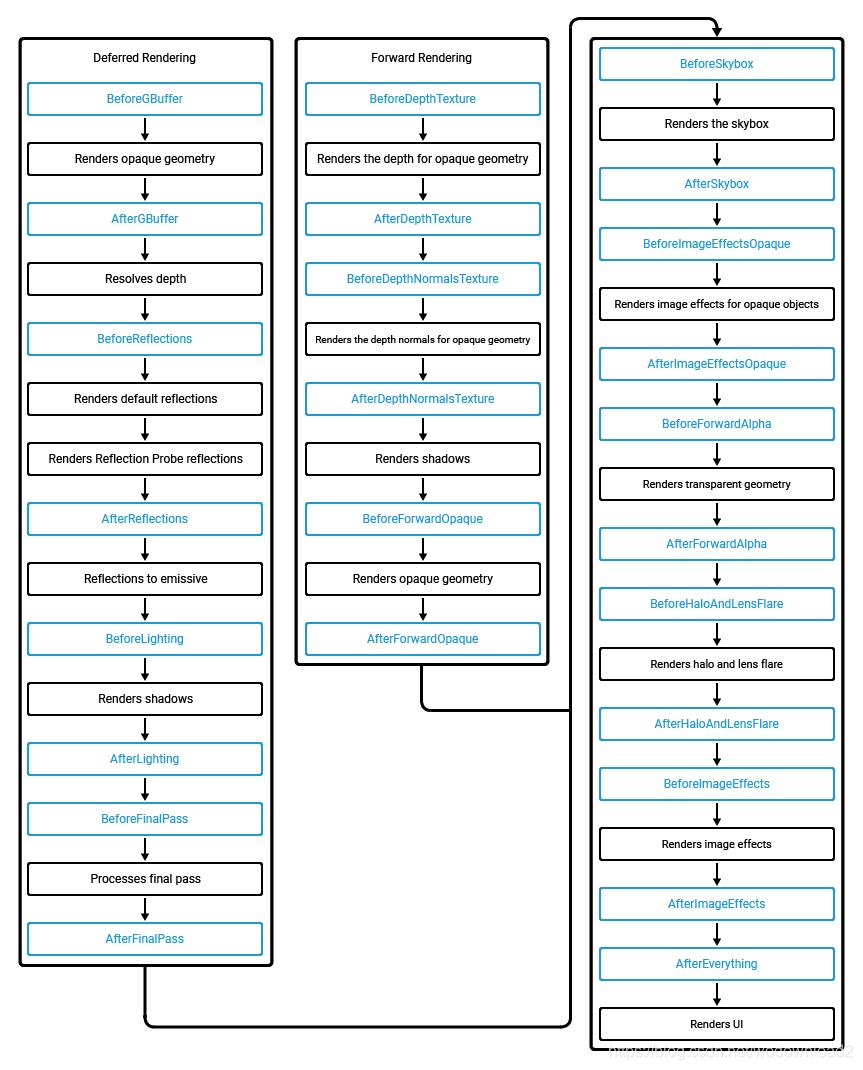
Graphics Command Buffers
command buffers allow u to extend unity’s built-in render pipeline. a command buffer holds a list of rendering commands which execute at various points during camera rendering. to specify a position in unity’s built-in render pipeline for a command buffer to exectue, use the CameraEvent.enum.
for example, u can use a command buffer with the AfterBuffer CameraEvent to render additional GameObjects into the Deferred pipeline, after the pipeline processes all opaque GameObjects.
below is a high-level overview of how Cameras use the Forward or Deferred pipeline to render a Scene in unity.
1、black boxes represent an internal unity process.
2、blue boxes represent a CameraEvent where u can add Command Buffers.
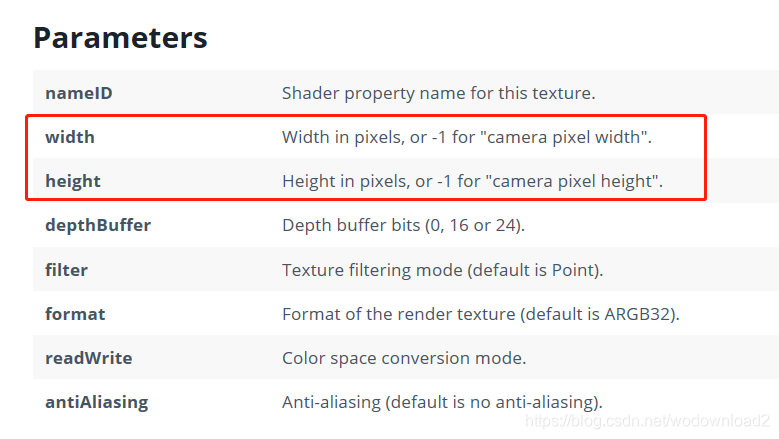
函数:CommandBuffer.GetTemporaryRT
public void GetTemporaryRT(int nameID, int width, int height, int depthBuffer = 0, FilterMode filter = FilterMode.Point, RenderTextureFormat format = RenderTextureFormat.Default, RenderTextureReadWrite readWrite = RenderTextureReadWrite.Default, int antiAliasing = 1);
Description
Add a “get a temporary render texture” command.
this creates a temporary render texture with given parameters, and sets it up as global shader property with nameID. Use Shader.PropertyToID to create the integer name.
Release the temporary render texture using ReleaseTemporaryRT, passing the same nameID. Any temporary textures that were not explicitly released will be removed after camera is done rendering, or after Graphics.ExecuteCommandBuffer is done.
After getting a temporary render texture, you can set it as active (SetRenderTarget) or blit to/from it (Blit). You do not explicitly need to preserve active render targets during command buffer execution (current render targets are saved & restored afterwards).
History
https://docs.unity3d.com/540/Documentation/ScriptReference/Rendering.CommandBuffer.Blit.html
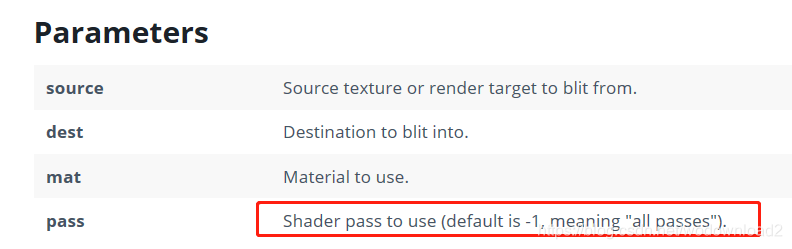
CommandBuffer.Blit
public void Blit(Texture source, Rendering.RenderTargetIdentifier dest);
public void Blit(Texture source, Rendering.RenderTargetIdentifier dest, Material mat);
public void Blit(Texture source, Rendering.RenderTargetIdentifier dest, Material mat, int pass);
public void Blit(Rendering.RenderTargetIdentifier source, Rendering.RenderTargetIdentifier dest);
public void Blit(Rendering.RenderTargetIdentifier source, Rendering.RenderTargetIdentifier dest, Material mat);
public void Blit(Rendering.RenderTargetIdentifier source, Rendering.RenderTargetIdentifier dest, Material mat, int pass);
description
add a “blit into a render texture” command.
This is similar to Graphics.Blit - it is mostly for copying from one (render)texture into another, potentially using a custom shader.
source texture or render target will be passed to the material as “_MainTex” property.
render texture to use can be indicated in several ways: a RenderTexture object, a temporary render texture created with GetTemporaryRT, or one of built-in temporary textures (BuiltinRenderTextureType). All that is expressed by a RenderTargetIdentifier struct, which has implicit conversion operators to save on typing.
note that Blit changes the currently active render target. after Blit executes, dest becomes the active render target.
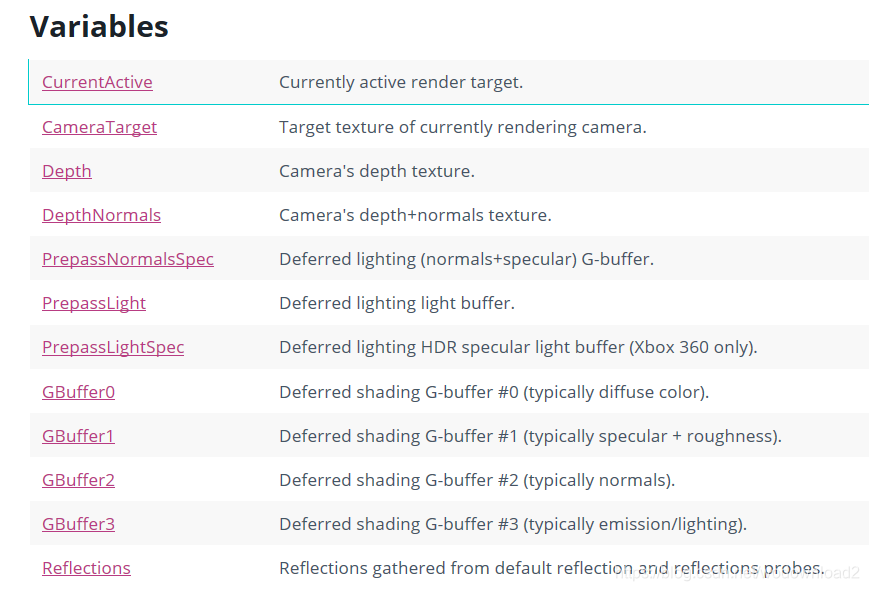
BuiltinRenderTextureType
https://docs.unity3d.com/540/Documentation/ScriptReference/Rendering.BuiltinRenderTextureType.html
description
built-in temporary render textures produced during camera’s rendering.
when camera is rendering the scene, in some cases it can produce temporary render textures in the process (e.g. depth textures, deferred G-buffer etc.) this enum indicates these temporary render textures.
BuiltinRenderTextureType can be used as a RenderTargetIdentifier in some functions of CommandBuffer.
举例:
https://blog.csdn.net/puppet_master/article/details/72669977
我们在渲染的时候,给OpenGL或者DX的就是一系列的指令,比如glDrawElement,glClear等等,这些东西目前是引擎去调用的,而unity也为我们封装了更高一级的API,就是CommandBuffer,可以让我们更近方便灵活地实现一些效果。CommandBuffer最主要的功能是可以预定义一系列的渲染指令,然后将这些指令在我们想要的时机进行执行。
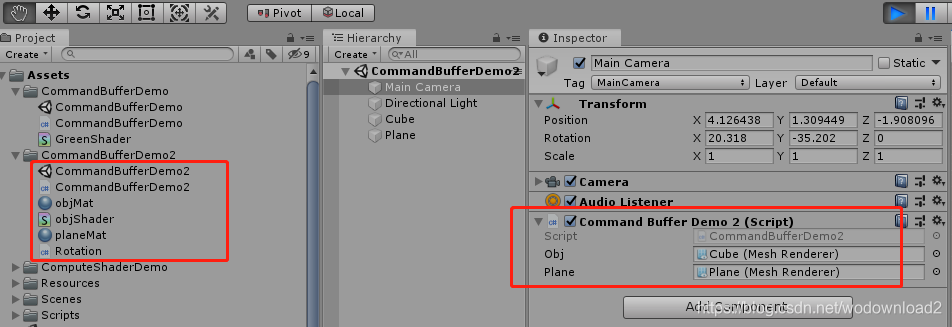
例子1:
画cube到UI上
using UnityEngine;
using UnityEngine.Rendering;
[ExecuteInEditMode]
public class CommandBufferDemo2 : MonoBehaviour
{
public Renderer obj = null;
public Renderer plane = null;
private RenderTexture rt = null;
private CommandBuffer cb = null;
void OnEnable()
{
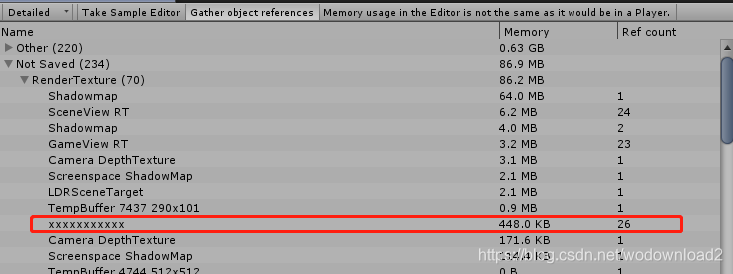
rt = RenderTexture.GetTemporary(128, 128, 16, RenderTextureFormat.ARGB32, RenderTextureReadWrite.Default, 4);
rt.name = "xxxxxxxxxxx";
cb = new CommandBuffer();
cb.name = "yyyyyyyyyyy";
cb.SetRenderTarget(rt);
cb.ClearRenderTarget(true, true, Color.yellow);
cb.DrawRenderer(obj, obj.sharedMaterial);
plane.sharedMaterial.mainTexture = rt;
Camera.main.AddCommandBuffer(CameraEvent.AfterForwardOpaque, cb);
}
void OnDisable()
{
Camera.main.RemoveCommandBuffer(CameraEvent.AfterForwardOpaque, cb);
cb.Clear();
rt.Release();
}
}
立方体上挂的脚本:
using UnityEngine;

[ExecuteInEditMode]
public class Rotation : MonoBehaviour
{
    public Vector3 angle = new Vector3(0, 2, 0);
    void Update()
    {
        this.transform.localEulerAngles += angle;
    }
}


 2194
2194


 被折叠的 条评论
为什么被折叠?
被折叠的 条评论
为什么被折叠?
 到【灌水乐园】发言


