


一、安装opencv
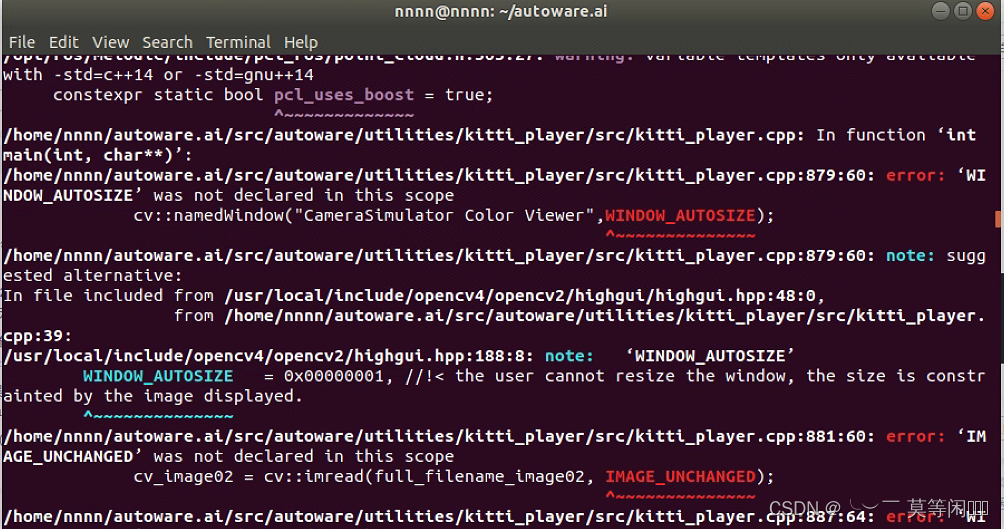
此处的opencv的版本不建议安装opencv4,opencv4会导致在编译autoware过程中出现一大堆问题,血的教训,比如:
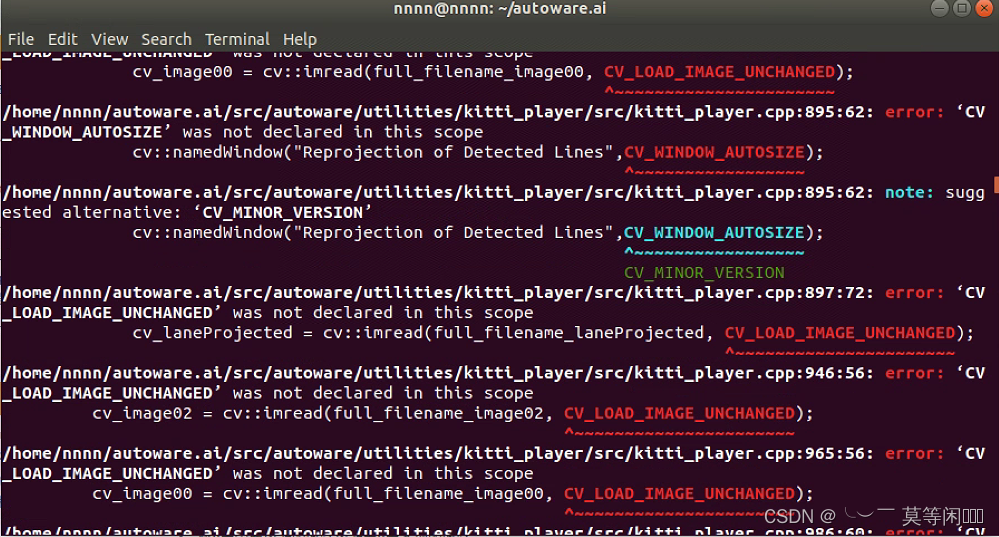
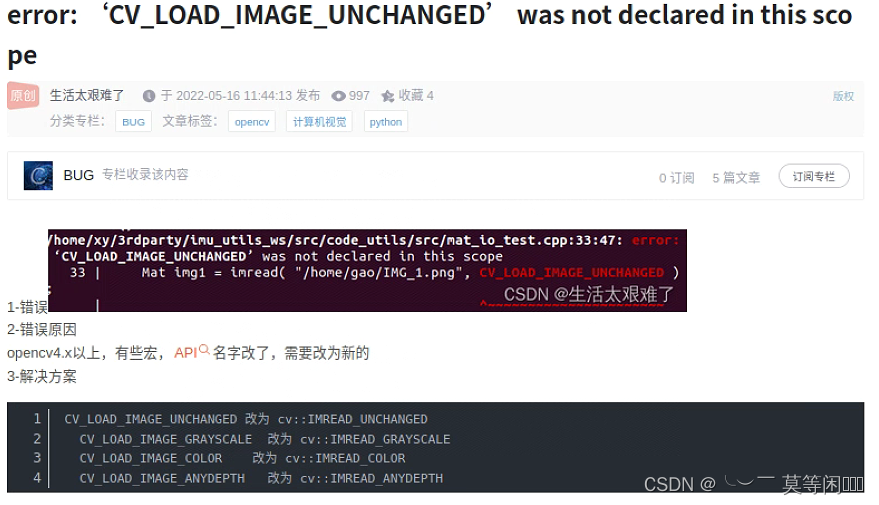
然后你开始按照网上的各种方法解决问题(添加头文件、将CV_LOAD_IMAGE_UNCHANGED改为IMAGE_UNCHANGED)你会发现还是报错:
 所以我就把opencv4卸载了,卸载可以参考这篇博客:
https://blog.csdn.net/wss794/article/details/124932353
然后开始安装opencv3,安装opencv3可以参考这篇博客:
https://blog.csdn.net/qq_41080854/article/details/88609795
二、安装autoware1.12.0
这里直接参考autoware官网安装即可:https://gitlab.com/autowarefoundation/autoware.ai/autoware/-/wikis/Source-Build
1)安装依赖项 System dependencies for Ubuntu 18.04 / Melodic
sudo apt update
sudo apt install -y python-catkin-pkg python-rosdep ros-$ROS_DISTRO-catkin
sudo apt install -y python3-pip python3-colcon-common-extensions python3-setuptools python3-vcstool
pip3 install -U setuptools
2)支持CUDA可以安装CUDA,不安装cuda也不影响
Additional system dependencies for CUDA support
See Requirements above for which CUDA version to use with your OS.
- For installation instructions for CUDA 10.0, see Installation Guide Linux :: CUDA Toolkit Documentation.
- For installation instructions for CUDA 9.0, see Installation Guide Linux :: CUDA Toolkit Documentation.
- For installation instructions for CUDA 8.0GA, see Installation Guide Linux :: CUDA Toolkit Documentation.
NOTE: To enable CUDA support on Melodic, Eigen is required to be updated.
WARNING: This might break your system, or the compilation of other programs
cd && wget http://bitbucket.org/eigen/eigen/get/3.3.7.tar.gz #Download Eigen
mkdir eigen && tar --strip-components=1 -xzvf 3.3.7.tar.gz -C eigen #Decompress
cd eigen && mkdir build && cd build && cmake .. && make && make install #Build and install
cd && rm -rf 3.3.7.tar.gz && rm -rf eigen #Remove downloaded and temporary files
2)创建目录
mkdir -p autoware.ai/src
cd autoware.ai
3) 下载autoware.ai的工作空间的配置
wget -O autoware.ai.repos "https://gitlab.com/autowarefoundation/autoware.ai/autoware/raw/1.12.0/autoware.ai.repos?inline=false"如果这里一直连接超时: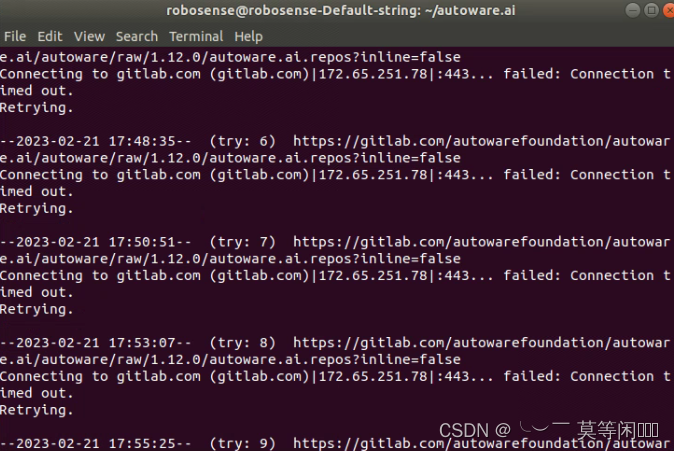
那么就打开下面这个链接(如果这个链接也打不开那么只能用能科学上网的电脑打开了)下载autoware.ai.repos:
https://gitlab.com/autowarefoundation/autoware.ai/autoware/raw/1.12.0/autoware.ai.repos?inline=false
这里也上传了该文件供大家下载:
(13条消息) ubuntu安装auto教程-Linux文档类资源-CSDN文库 https://download.csdn.net/download/qq_49959714/87473305
并将它放到autoware.ai的目录下
4)下载autoware.ai到工作区
vcs import src < autoware.ai.repos这一步会需要等待一段时间,有可能还会报错,报错就多重复几次上面这条语句可以解决
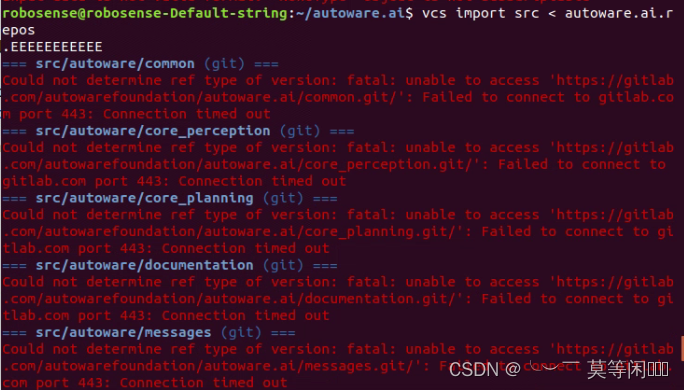
如果一直报错不能解决,那么还是只能手动下载了:
即打开autoware.ai.repos会看到很多链接,一个个打开下载。
所需的文件我这里也上传了,可以直接在这里下载:
(13条消息) 安装autoware教程-Linux文档类资源-CSDN文库https://download.csdn.net/download/qq_49959714/87473301

将这些文件全部解压并复制到autoware.ai/src目录下
5)使用rosdep安装依赖项
rosdep update
rosdep install -y --from-paths src --ignore-src --rosdistro $ROS_DISTRO
如果rosdep update出错:
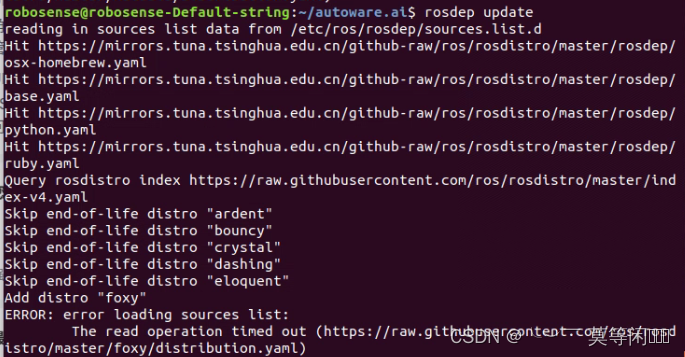
这里建议直接用小鱼的rosdepc,又快又好用
wget http://fishros.com/install -O fishros && bash fishros
输入数字3安装小鱼的rosdepc
然后执行以下命令:
rosdepc update
rosdepc install -y --from-paths src --ignore-src --rosdistro $ROS_DISTRO
6)编译工作区若已经配置好了 CUDA:
AUTOWARE_COMPILE_WITH_CUDA=1 colcon build --cmake-args -DCMAKE_BUILD_TYPE=Release
若没有 CUDA支持,只使用 CPU:
colcon build --cmake-args -DCMAKE_BUILD_TYPE=Release
这一步耗时比较久
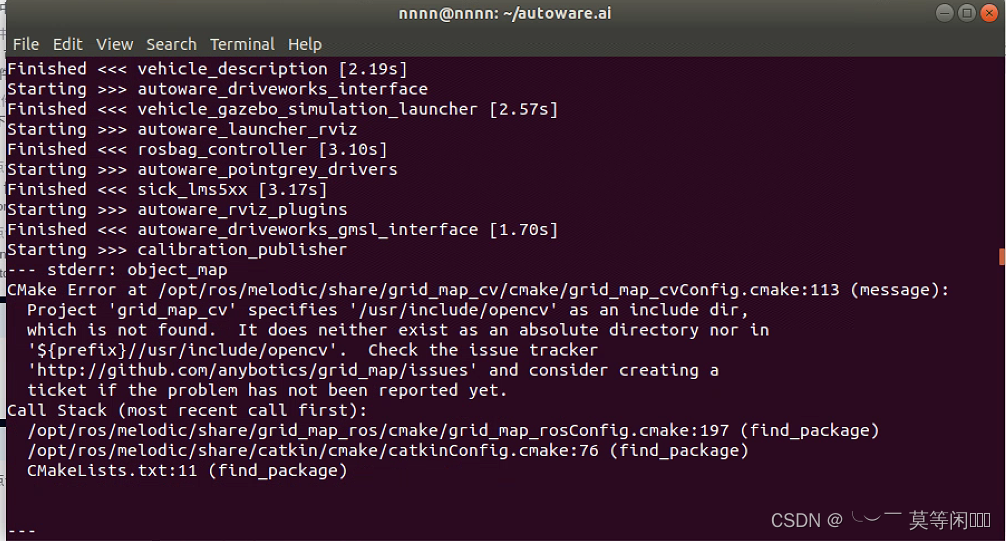
理论上经过以上能安装上,但实际还是会遇到一些问题的,比如:
问题1:
CNake Error at /opt/ros/melodic/share/grid_nap_cv/cmake/grid_nap_cvConfig.cnake:113 (nessage):Project 'grid_nap_cv'specifies '/usr/include/opencv' as an include dir,
which is not found. It does neither exist as an absolute directory nor in's{prefix} //usr/include/opencv'. check the issue tracker
'http://github.con/anybotics/grid_nap/issues' and consider creating aticket if the probien has not been reported yet.
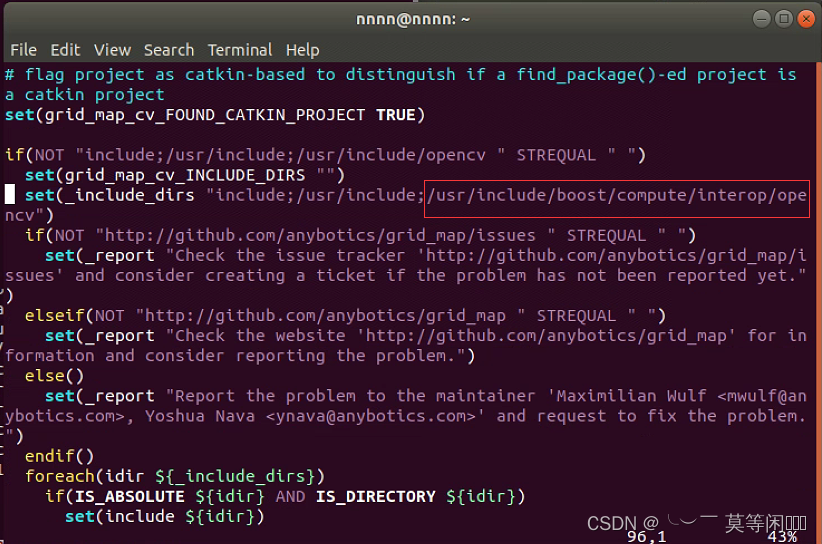
解决办法:
修改grid_nap_cvConfig.cnake
vim /opt/ros/melodic/share/grid_nap_cv/cmake/grid_nap_cvConfig.cnake
将/usr/include/opencv改为/usr/include/boost/compute/interop/opencv
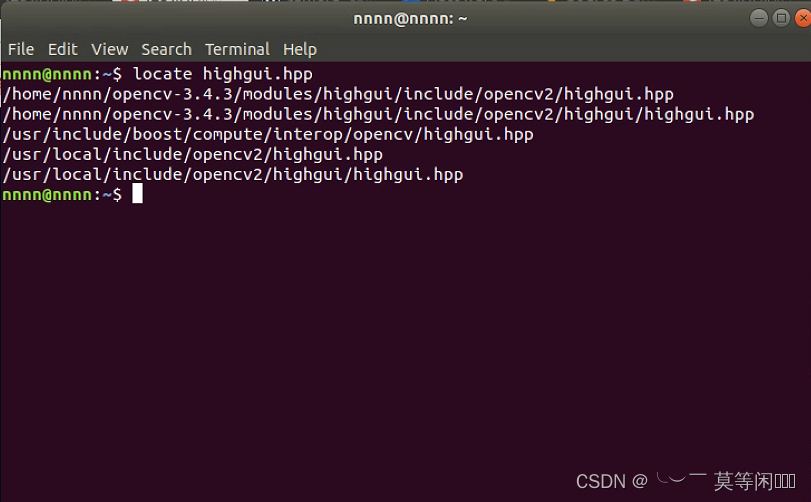
每个人的路径可能会不同,可以在终端输入以下命令来查看自己的路径:
locate highgui.hpp
问题2:
CNakeFiles/calibration_publisher .dir/src/calibration_publisher.cpp.o: In function 'main':
calibration_publisher.cpp:(.text.startup+0xb8e): undefined reference to 'cv::read(cv::FileNode const&,std::__Cxx11::basic_stringechar, std::char_traits<char>, std::allocator<char> >&,std::_cxx1.1::basic_string<char,std::char_traits<char>, std::allocatorechar> > const&)'
collect2: error: ld returned 1 exit status
make[2]: ***[devel/lib/calibration_publisher /calibration_publisher ] Error 1ake[1]: ***[CMakeFiles/calibration_publisher.dir/all] Error 2
make:***[all] Error 2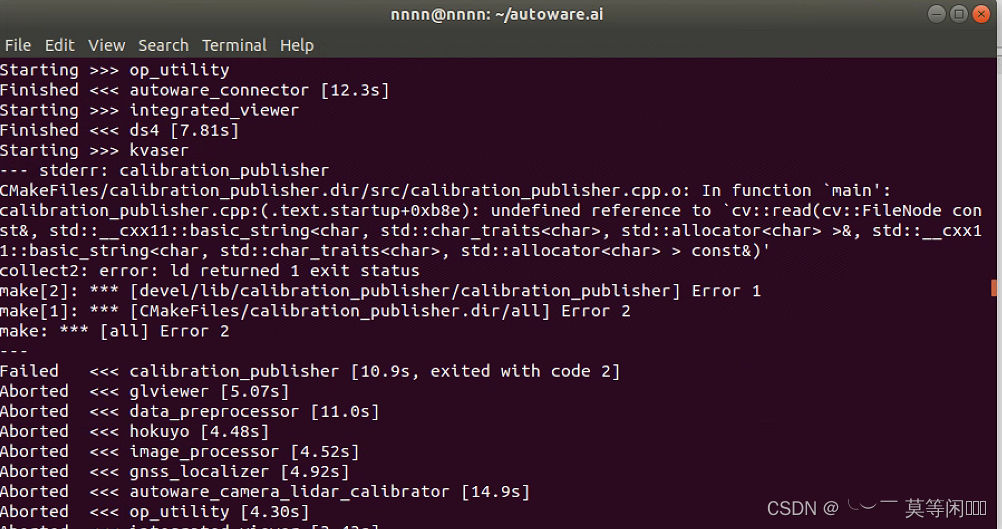
解决办法:
修改文件1:
/home/xxx/autoware.ai/src/autoware/utilities/calibration_publisher/CMakeLists.txt
在后面加上${OpenCV_LIBS}即可;

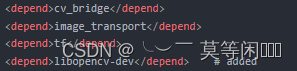
修改文件2:
/home/xxx/autoware.ai/src/autoware/utilities/calibration_publisher/package.xml
在后面加上<depend>libopencv-dev</depend>即可
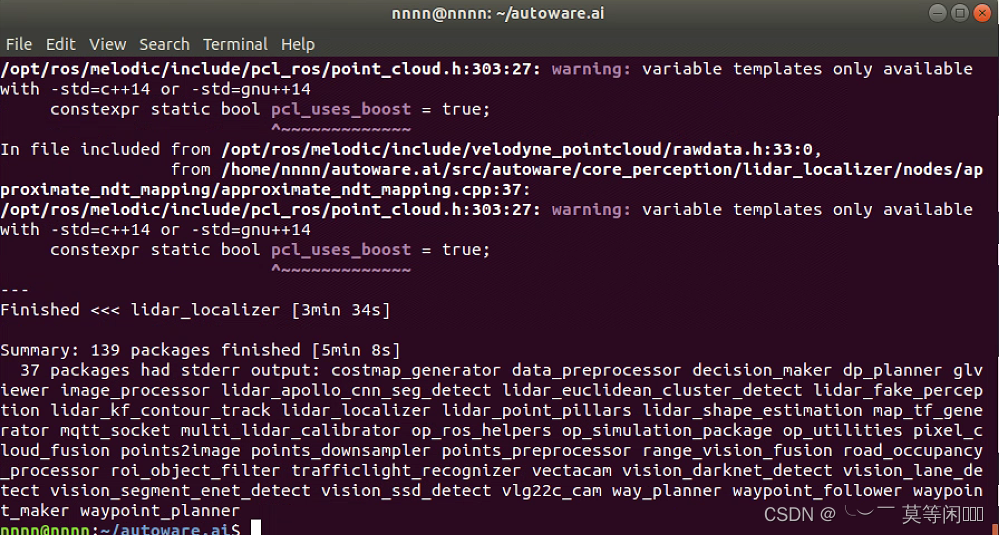
至此autoware编译终于成功了
可以使用官方给出的 demo 测试下软件
ROSBAG Demo · Wiki · Autoware Foundation / MovedToGitHub / autoware · GitLab
三、相机的内参的标定
可以用录制好的rosbag离线标定,也可以在线标定,建议在线标定,因为离线标定不太好把控录制多长时间可以完成相机内参标定
1、离线标定
注:所有有关路径和激光雷达、相机驱动路径、话题名称都需要根据自己的来输入对应的命令
1)录制rosbag
cd ~/catkin_ws/
source devel/setup.bash
roslaunch rslidar_sdk start.launch
roslaunch usb_cam usb_cam-test.launch
cd /home/nnnn/lidar_cam_date_pro/bag //bag保存路径
rosbag record -b 4096 -o calibration.bag /rslidar_points /usb_cam/image_raw
2)
roscore
cd autoware.ai //新的终端
source install/setup.bash
rosrun autoware_camera_lidar_calibrator cameracalibrator.py --square 0.0245 --size 6x8 image:=/usb_cam/image_raw
3)播放录制好的bag包(在线标定不需要这一步)
cd /home/nnnn/lidar_cam_date_pro/bag
rosbag play xx.bag
//CALIBRATE按钮亮时点击,然后点击SAVE即可得到相机内参。
2、在线标定
1)启动相机
cd ~/catkin_ws/
source devel/setup.bash
roslaunch usb_cam usb_cam-test.launch
2)
cd autoware.ai //新的终端
source install/setup.bash
rosrun autoware_camera_lidar_calibrator cameracalibrator.py --square 0.0245 --size 6x8 image:=/usb_cam/image_raw
//移动棋盘格近距离:左右、上下;远距离:左右、上下;倾斜:左右、上下
//CALIBRATE按钮亮时点击,然后点击SAVE即可得到相机内参,内参保存在/home/nnnn
2、相机和激光雷达外参的标定
1.得到内参后,我们在autoware中的终端使用如下命令:
roslaunch autoware_camera_lidar_calibrator camera_lidar_calibration.launch intrinsics_file:=/home/nnnn/20220808_1002_autoware_camera_calibration.yaml image_src:=/usb_cam/image_raw
2.启动相机和激光雷达 (也可以用录制好rosbag离线标定)
cd ~/catkin_ws/
source devel/setup.bash
roslaunch rslidar_sdk start.launch
roslaunch usb_cam usb_cam-test.launch
3.在新的终端启动rviz
cd autoware.ai //新的终端
source install/setup.bash
rosrun rviz rviz
//订阅点云话题,注意将fixed frame改为rslidar
//在图像中找到一个可以匹配点云中对应点的点
//单击图像中点的像素
//使用Publish Point工具单击Rviz中的相应3D点
//用至少9个不同点重复此操作
//完成后,文件将保存在home目录中,名称为YYYYmmdd_HHMM_autoware_lidar_camera_calibration.yaml,此文件可与Autoware的Calibration Publisher一起使用,以发布和对齐LiDAR与相机之间的转换。该文件包含内参和外参。
相机和激光雷达的标定可以参考这篇博客:
https://blog.csdn.net/learning_tortosie/article/details/82347694
3、查看标定效果
使用autoware自带的calibration publisher将图像和点云融合可以查看效果:
1)修改cpp文件里的话题为自己的雷达话题
gedit autoware.ai/src/visualization/points2image/nodes/points2image/points2image.cpp

2)重新编译cpp文件
cd autoware.ai
colcon build --cmake-args -DCMAKE_BUILD_TYPE=Release --packages-select points2image
3) 驱动autoware可视化界面
source install/setup.bash
rosrun runtime_manager runtime_manager_dialog.py 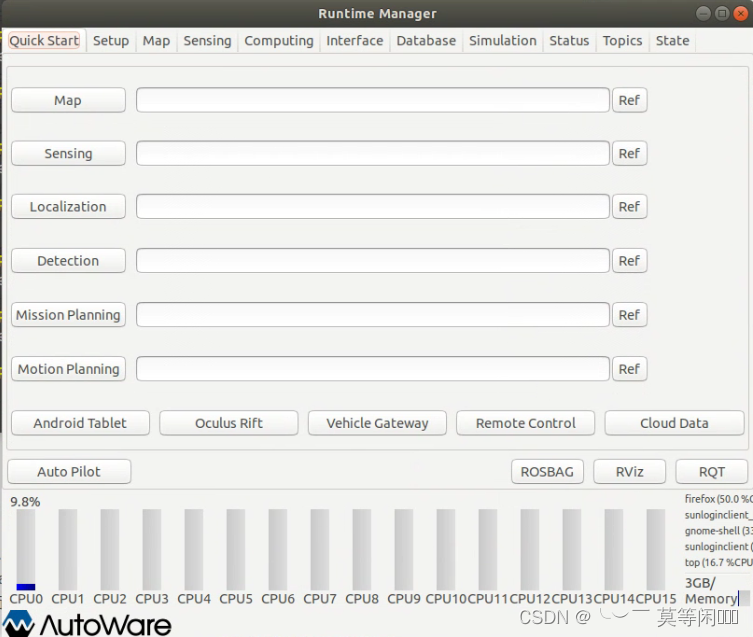
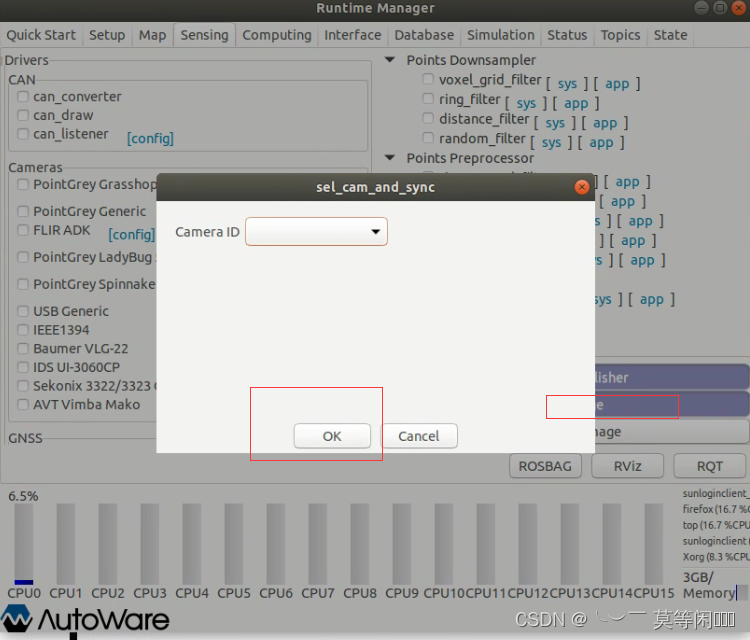
点击sensing,然后点击calibration publisher

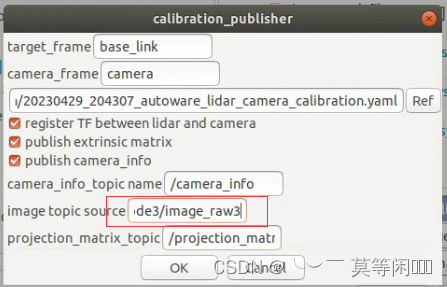
修改 target_frame为自己点云数据的frame_id
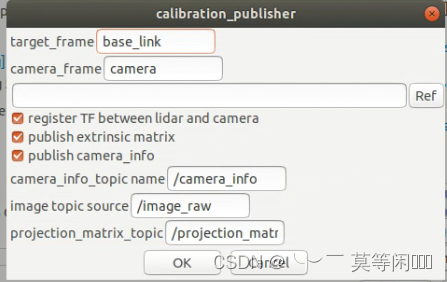
载入标定得到的外参文件
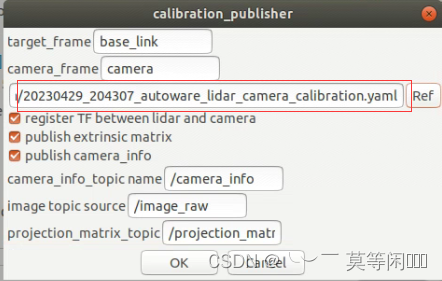
将image topic source更改为自己的图像topic名称,然后点击OK
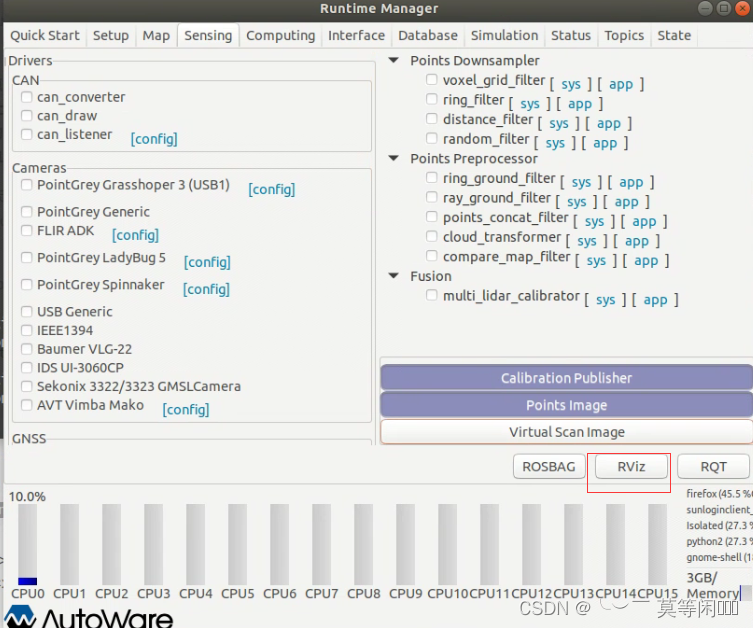
点击Calibration Publishe下面的Points image按钮
点击Rviz
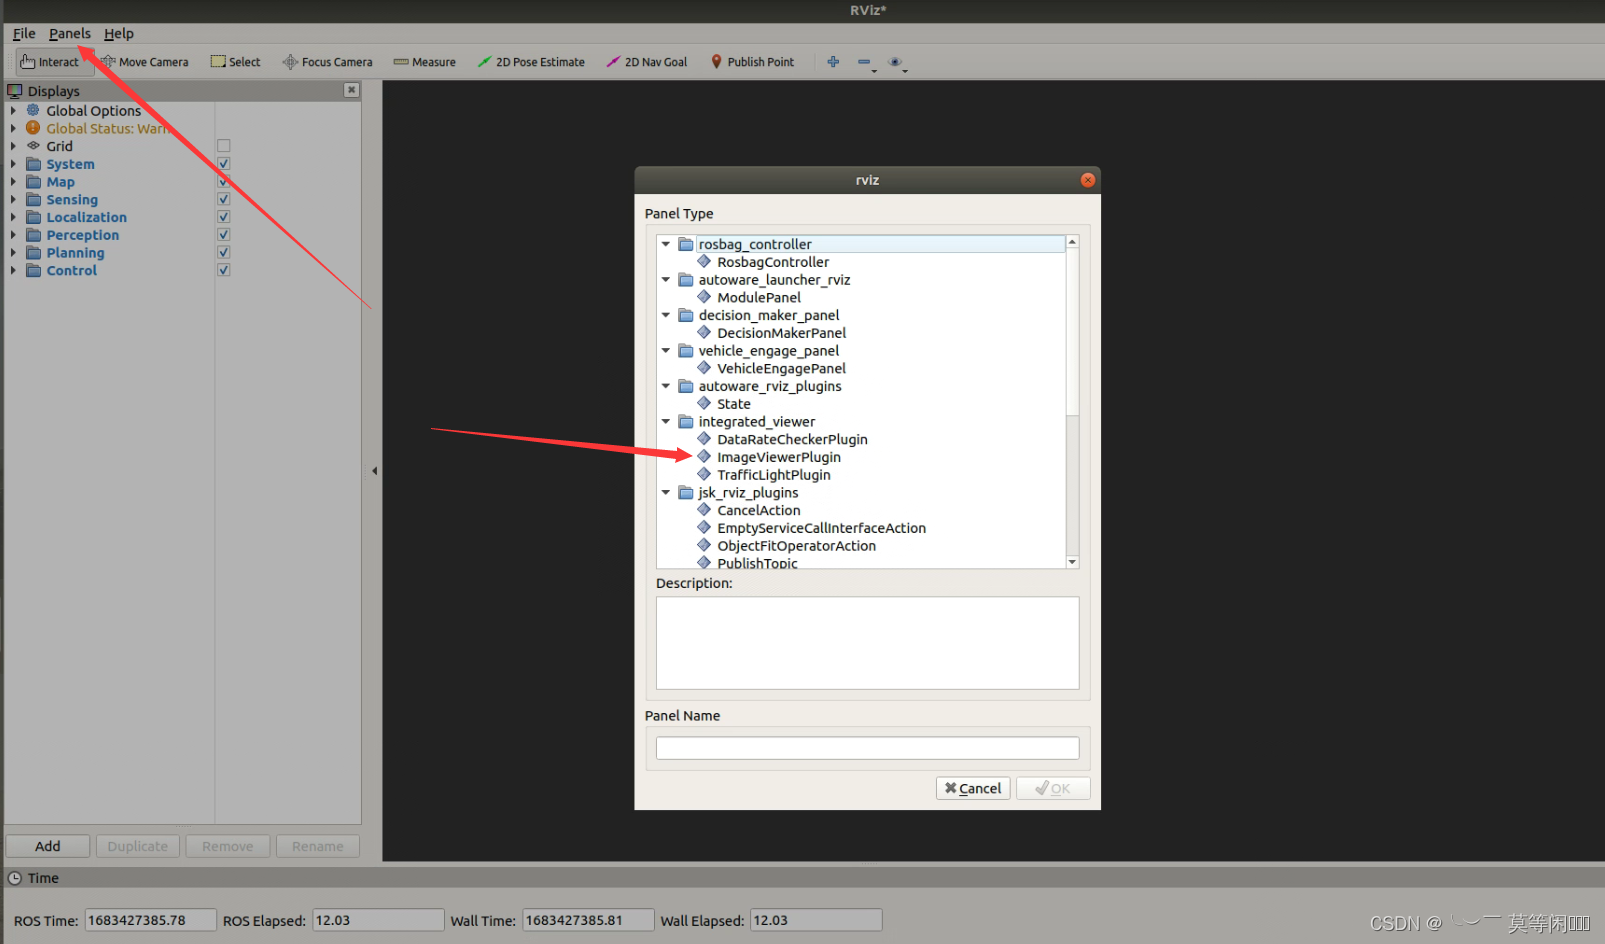
在RViz中,Panels -> Add New Panel中添加ImageViewerPlugin
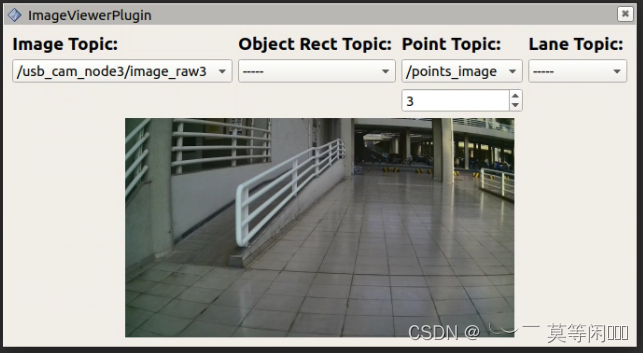
此时ImageViewerPlugin会出现在RViz的左下方,然后播放数据包,填写Image Topic:/camera_topic, Point Topic:/points_image,会看到将点云数据映射到图像上之后的融合图,通过融合图可以直观看出标定效果。

把窗口上下拉大一点


 1461
1461

 被折叠的 条评论
为什么被折叠?
被折叠的 条评论
为什么被折叠?
 到【灌水乐园】发言


