


通过mavros实现无人机航点飞行(mission模式)

垂起固定翼通过mavros实现航点飞行gazebo仿真演示与代码讲解20240524
mavros提供了mavros/mission/push这个service可以进行航点上传,mavros/mission/pull可以进行航点下载,mavros/mission/clear可以进行航点清除。
http://wiki.ros.org/mavros

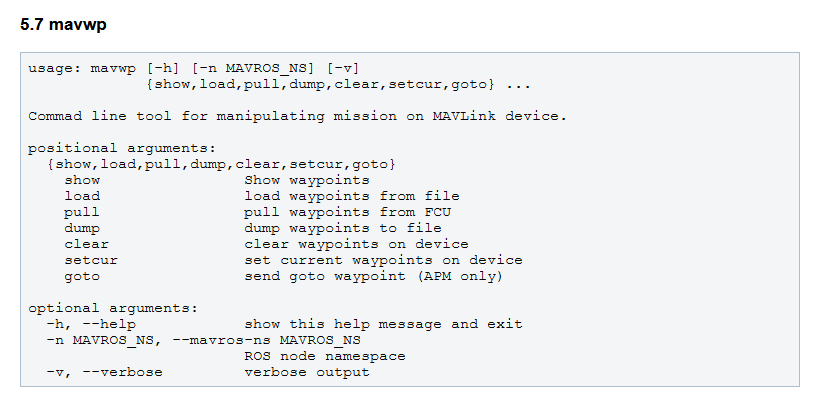
也可以借助于mavwp命令实现一些航点相关操作,这个比较小众,这里不详细展开。
http://docs.ros.org/en/api/mavros_msgs/html/srv/WaypointPush.html

WaypointPush类型里面,start_index值为0代表上传更新全部航点,似乎可以只更新部分航点,笔者没有这么用过。
mavros_msgs/Waypoint[] waypoints是一个个mavros_msgs/Waypoint类型组成的,mavros_msgs/Waypoint类型定义如下
http://docs.ros.org/en/api/mavros_msgs/html/msg/Waypoint.html

全部内容如下
# Waypoint.msg
#
# ROS representation of MAVLink MISSION_ITEM
# See mavlink documentation


# see enum MAV_FRAME
uint8 frame
uint8 FRAME_GLOBAL = 0
uint8 FRAME_LOCAL_NED = 1
uint8 FRAME_MISSION = 2
uint8 FRAME_GLOBAL_REL_ALT = 3
uint8 FRAME_LOCAL_ENU = 4
uint8 FRAME_GLOBAL_INT = 5
uint8 FRAME_GLOBAL_RELATIVE_ALT_INT = 6
uint8 FRAME_LOCAL_OFFSET_NED = 7
uint8 FRAME_BODY_NED = 8
uint8 FRAME_BODY_OFFSET_NED = 9
uint8 FRAME_GLOBAL_TERRAIN_ALT = 10
uint8 FRAME_GLOBAL_TERRAIN_ALT_INT = 11
uint8 FRAME_BODY_FRD = 12
uint8 FRAME_RESERVED_13 = 13
uint8 FRAME_RESERVED_14 = 14
uint8 FRAME_RESERVED_15 = 15
uint8 FRAME_RESERVED_16 = 16
uint8 FRAME_RESERVED_17 = 17
uint8 FRAME_RESERVED_18 = 18
uint8 FRAME_RESERVED_19 = 19
uint8 FRAME_LOCAL_FRD = 20
uint8 FRAME_LOCAL_FLU = 21

# see enum MAV_CMD and CommandCode.msg
uint16 command

bool is_current
bool autocontinue
# meaning of this params described in enum MAV_CMD
float32 param1
float32 param2
float32 param3
float32 param4
float64 x_lat
float64 y_long
float64 z_alt
注释里有说明对应的MISSION_ITEM这个mavlink消息,MISSION_ITEM在2020年后被MISSION_ITEM_INT消息取代,所以实际发的MISSION_ITEM_INT消息,嵌套有MAV_CMD消息。
注意mavros消息类型里面经度和纬度是float64类型,我们就按照浮点数赋值即可,虽然MISSION_ITEM_INT消息里经度和纬度是int32类型,这个mavros自己会做相应转换。

坐标系frame不同取值的含义如下
FRAME_GLOBAL (0):使用全局坐标系(经度、纬度和海拔)来表示航点的位置。

FRAME_LOCAL_NED (1):使用本地坐标系(北、东、地下偏移)来表示航点的位置。这个本地坐标系是以起始位置作为原点建立的。

FRAME_MISSION (2):使用任务坐标系来表示航点的位置,任务坐标系是相对于导航目标点的坐标系。

FRAME_GLOBAL_REL_ALT (3):使用全局坐标系(经度、纬度和相对海拔)来表示航点的位置。

FRAME_LOCAL_ENU (4):使用本地坐标系(东、北、向上偏移)来表示航点的位置。

FRAME_GLOBAL_INT (5):与FRAME_GLOBAL相似,但使用带有整数解析度的全局坐标。

FRAME_GLOBAL_RELATIVE_ALT_INT (6):与FRAME_GLOBAL_REL_ALT相似,但使用带有整数解析度的全局坐标。

FRAME_LOCAL_OFFSET_NED (7):使用本地坐标系(北、东、地下偏移)来表示相对于当前位置的航点位置。

FRAME_BODY_NED (8):使用机体坐标系(前、右、下)来表示航点的位置。

FRAME_BODY_OFFSET_NED (9):使用机体坐标系(前、右、下)来表示相对于当前位置的航点位置。

FRAME_GLOBAL_TERRAIN_ALT (10):使用全局坐标系(经度、纬度和地形高度)来表示航点的位置。

FRAME_GLOBAL_TERRAIN_ALT_INT (11):与FRAME_GLOBAL_TERRAIN_ALT相似,但使用带有整数解析度的全局坐标。

FRAME_BODY_FRD (12):使用机体坐标系(前、右、向下)来表示航点的位置。

FRAME_LOCAL_FRD (20): 使用本地坐标系(前、右、向下)来表示航点的位置。这个坐标系在无人机飞行控制中比较常见,它使用无人机当前位置为原点,以向前(前进方向)、向右(滑行方向)和向下(下降方向)作为坐标轴。

FRAME_LOCAL_FLU (21): 使用本地坐标系(前、左、向上)来表示航点的位置。类似于FRAME_LOCAL_FRD,但使用向前、向左和向上作为坐标轴。
本质也还是MAV_CMD,所以也有7个参数可以配置的。
飞航线本质可以理解为执行一个又一个MAV_CMD命令,每个航点对应一个MAV_CMD命令,第一个都得默认是TAKE OFF(如果飞机没有起飞,则切到mission之后会自动起飞并飞往第一个航点,如果飞机已经起飞也没有关系,切mission后则是直接飞往第一个航点,注意这个点的位置并不需要在无人机当前位置正上方),这里的uint16 command也就是这个意思,值为对应要执行的MAV_CMD的消息ID值,就是每个航点实际对应执行的命令。

一些航点可选的MAV_CMD举例如下
MAV_CMD_NAV_WAYPOINT

MAV_CMD_NAV_TAKEOFF

MAV_CMD_NAV_LAND

MAV_CMD_NAV_VTOL_TAKEOFF
垂起固定翼的起飞航点可以用这个指令,垂直起飞后会自动切固定翼飞往第一个航点

MAV_CMD_NAV_VTOL_LAND

在上面的几个MAV_CMD中,除了经度纬度高度的赋值外,偏航的赋值也需要注意下,如果想让无人机偏航自动朝向下一个航点,则偏航赋值为NaN,而不是赋值为0。
通过 mavros/mission/push 这个服务进行航点上传
这里坐标系选择的 FRAME_GLOBAL_REL_ALT ,因为是使用相对海拔。
关于给的经纬度需要精确到小数点后几位,可以参考下面表格,一般精确到小数点后7位。
https://blog.csdn.net/lang_niu/article/details/123550453

下面代码的主体流程是,先上传航点,再下载航点确认,再解锁无人机,再切mission,这样无人机就可以开始自动起飞执行航点任务了。
代码来自:https://github.com/Mohit505Git/Mavros-AUTO.MISSION-mode
以此航点的赋值为例做下讲解
w = wayp0.setWaypoints(3,22,True,True,0.0,0.0,0.0,float('nan'),47.397713,8.547605,50)
frame = 3是指坐标系frame的值为3,也就是用的FRAME_GLOBAL_REL_ALT坐标系,这项也对应着MISSION_ITEM_INT这个mavlink消息里的frame这一项。
command = 22指此航点执行的id是22的MAV_CMD,也就是MAV_CMD_NAV_TAKEOFF,这项也对应着MISSION_ITEM_INT这个mavlink消息里的command这一项。这里坐标系选择的 FRAME_GLOBAL_REL_ALT ,因为是使用相对海拔。
is_current = True 意思是此航点作为当前要执行的航点,也就是从此航点开始执行,注意上传的航点里面就让一个航点的is_current为true就行,其他都为false,一般第一个航点的is_current为true,代表从第一个航点开始飞。这项也对应着MISSION_ITEM_INT这个mavlink消息里的current这一项。
autocontinue = True 意思是到达此航点后自动飞往下一个航点,这项也对应着MISSION_ITEM_INT这个mavlink消息里的autocontinue这一项。
param1 = 0 此参数无定义
param2 = 0 此参数无定义
param3 = 0 此参数无定义
param4 = NAN 偏航自动朝向下一个航点
x_lat = 47.397713 航点纬度
y_long = 8.547605 航点经度
z_alt = 50 高度,是在FRAME_GLOBAL_REL_ALT坐标系下的高度,是相对海拔
wayPointMission.py
#!/usr/bin/env python
# ROS python API
import rospy

# 3D point & Stamped Pose msgs
from geometry_msgs.msg import Point, PoseStamped
# import all mavros messages and services
from mavros_msgs.msg import *
from mavros_msgs.srv import *


class Modes:
    def __init__(self):
        pass

    def setArm(self):
        rospy.wait_for_service('mavros/cmd/arming')
        try:
            armService = rospy.ServiceProxy('mavros/cmd/arming', mavros_msgs.srv.CommandBool)
            armService(True)
        except rospy.ServiceException, e:
            print "Service arming call failed: %s"%e

    def auto_set_mode(self):
        rospy.wait_for_service('mavros/set_mode')
        try:
            # setModeService = rospy.ServiceProxy('mavros/set_mode', mavros_msgs.srv.set_mode.request.custom_mode)
            setModeService = rospy.ServiceProxy('mavros/set_mode', mavros_msgs.srv.SetMode)
            setModeService(custom_mode="AUTO.MISSION")
        except rospy.ServiceException, e:
            print "Service takeoff call failed: %s"%e

    def wpPush(self,index,wps):
        rospy.wait_for_service('mavros/mission/push')
        try:
            wpPushService = rospy.ServiceProxy('mavros/mission/push', WaypointPush,persistent=True)
            wpPushService(start_index=0,waypoints=wps)#start_index = the index at which we want the mission to start
            print "Waypoint Pushed"
        except rospy.ServiceException, e:
            print "Service takeoff call failed: %s"%e
    def wpPull(self,wps):
        rospy.wait_for_service('mavros/mission/pull')
        try:
            wpPullService = rospy.ServiceProxy('mavros/mission/pull', WaypointPull,persistent=True)
            print wpPullService().wp_received

            print "Waypoint Pulled"
        except rospy.ServiceException, e:
            print "Service Puling call failed: %s"%e

class stateMoniter:
    def __init__(self):
        self.state = State()
        # Instantiate a setpoints message
        self.sp = PositionTarget()

        # set the flag to use position setpoints and yaw angle
        self.sp.type_mask = int('010111111000', 2)

    def stateCb(self, msg):
        self.state = msg

class wpMissionCnt:

    def __init__(self):
        self.wp =Waypoint()

    def setWaypoints(self,frame,command,is_current,autocontinue,param1,param2,param3,param4,x_lat,y_long,z_alt):
        self.wp.frame =frame #  FRAME_GLOBAL_REL_ALT = 3 for more visit http://docs.ros.org/api/mavros_msgs/html/msg/Waypoint.html
        self.wp.command = command #'''VTOL TAKEOFF = 84,NAV_WAYPOINT = 16, TAKE_OFF=22 for checking out other parameters go to https://github.com/mavlink/mavros/blob/master/mavros_msgs/msg/CommandCode.msg'''
        self.wp.is_current= is_current
        self.wp.autocontinue = autocontinue # enable taking and following upcoming waypoints automatically
        self.wp.param1=param1 # no idea what these are for but the script will work so go ahead
        self.wp.param2=param2
        self.wp.param3=param3
        self.wp.param4=param4
        self.wp.x_lat= x_lat
        self.wp.y_long=y_long
        self.wp.z_alt= z_alt #relative altitude.

        return self.wp


def main():
    rospy.init_node('waypointMission', anonymous=True)
    rate = rospy.Rate(20.0)

    stateMt = stateMoniter()
    md = Modes()

    wayp0 = wpMissionCnt()
    wayp1 = wpMissionCnt()
    wayp2 = wpMissionCnt()
    wayp3 = wpMissionCnt()

    wps = [] #List to story waypoints

    w = wayp0.setWaypoints(3,22,True,True,0.0,0.0,0.0,float('nan'),47.397713,8.547605,50)
    wps.append(w)

    w = wayp1.setWaypoints(3,16,False,True,0.0,0.0,0.0,float('nan'),47.398621,8.547745,50)
    wps.append(w)

    w = wayp2.setWaypoints(3,16,False,True,0.0,0.0,0.0,float('nan'),47.399151,8.545320,50)
    wps.append(w)

    print wps
    md.wpPush(0,wps)

    md.wpPull(0)
    rospy.Subscriber("/mavros/state",State, stateMt.stateCb)

    # Arming the drone
    while not stateMt.state.armed:
        md.setArm()
        rate.sleep()
    # Switching the state to auto mode
    while not stateMt.state.mode=="AUTO.MISSION":
        md.auto_set_mode()
        rate.sleep()
        print "AUTO.MISSION"

    # rospy.spin()


if __name__ == '__main__':
    try:
        main()
    except rospy.ROSInterruptException:
        pass
wayPointMission.py使用方法很简单,基本的px4 gazebo mavros仿真环境起起来之后,直接运行python wayPointMission.py即可,无人机会自动解锁切mission,然后起飞依次飞往三个航点,到达最后一个航点后会在此航点保持悬停。wayPointMission.py内容如上,不用建工作空间,python脚本起ros节点确实非常方便,一个Python文件即可。

可以同时地面站查看POSITION_TARGET_GLOABL_INT mavlink消息,看名称可知数值是整型,看当前的目标点就是所发的第一个航点的经纬高。

无人机到达第一个航点后飞往第二个航点

查看POSITION_TARGET_GLOABL_INT mavlink消息,可以看到当前的目标点就是所发的第二个航点的经纬高。

抵达第三个航点

地面站查看GLOBAL_POSITION_INT消息,可以看到无人机当前的经纬高就是第三个航点的经纬高,数据是整型显示的。
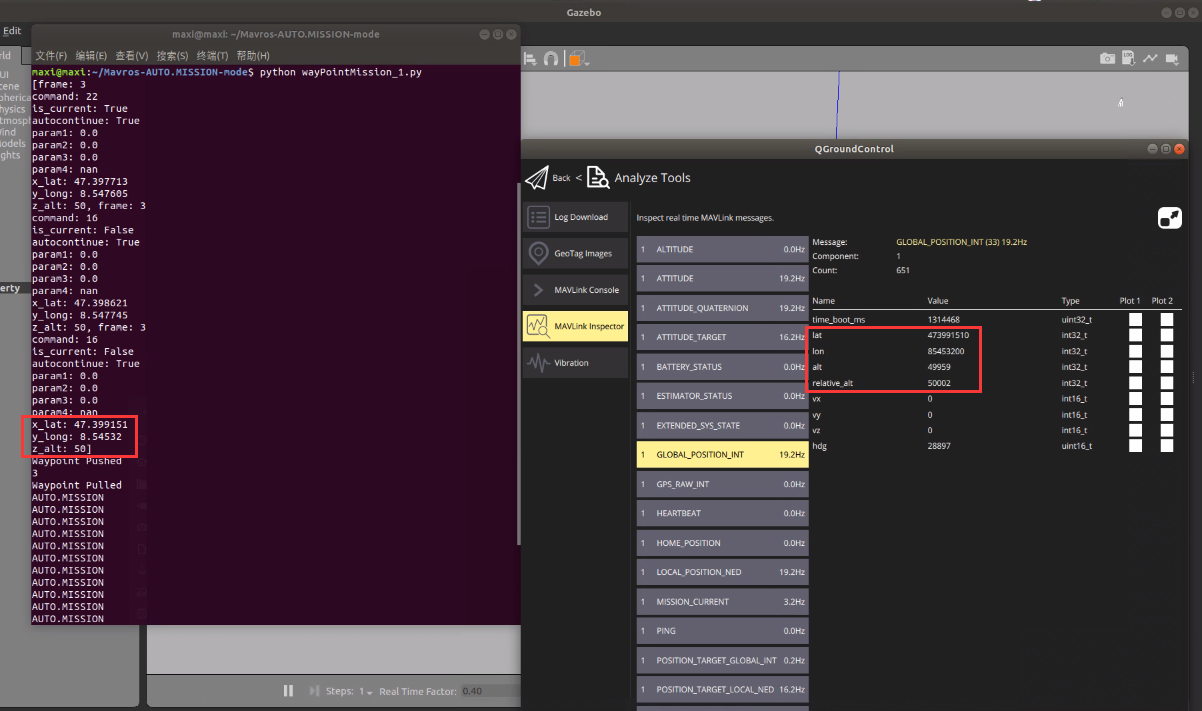
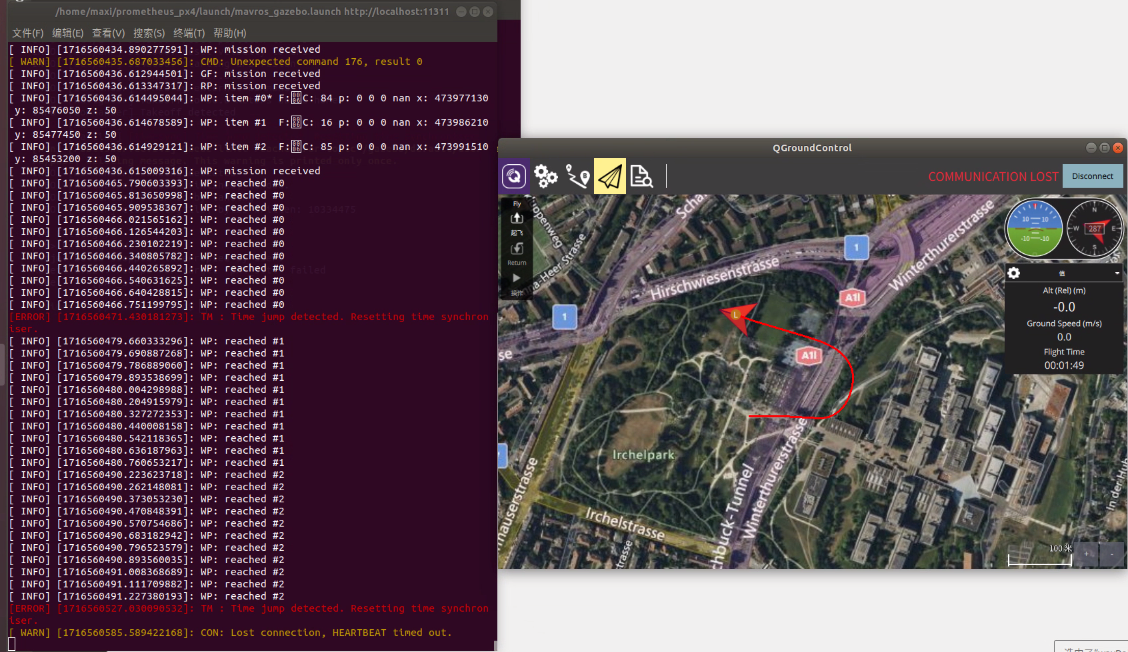
mavros的终端打印,可以看到航点上传,以及依次到达各个航点的提示。

我们也可以把最后一个航点的命令改为MAV_CMD_NAV_LAND(21),则无人机到达最后一个航点后会在Mission模式下自动降落,落地后自动上锁。
    w = wayp0.setWaypoints(3,22,True,True,0.0,0.0,0.0,float('nan'),47.397713,8.547605,50)
    wps.append(w)

    w = wayp1.setWaypoints(3,16,False,True,0.0,0.0,0.0,float('nan'),47.398621,8.547745,50)
    wps.append(w)

    w = wayp2.setWaypoints(3,21,False,True,0.0,0.0,0.0,float('nan'),47.399151,8.545320,50)
    wps.append(w)

对于垂起固定翼,我们可以把起飞航点的MAV_CMD改为MAV_CMD_NAV_TAKEOFF(84),垂起会先以旋翼模式垂直起飞,然后切到固定翼依次到达各个航点,轨迹如下图所示
同时可以明显感受到垂起固定翼飞完这三个航点比四旋翼快太多了。
    w = wayp0.setWaypoints(3,84,True,True,0.0,0.0,0.0,float('nan'),47.397713,8.547605,50)
    wps.append(w)

    w = wayp1.setWaypoints(3,16,False,True,0.0,0.0,0.0,float('nan'),47.398621,8.547745,50)
    wps.append(w)

    w = wayp2.setWaypoints(3,16,False,True,0.0,0.0,0.0,float('nan'),47.399151,8.545320,50)
    wps.append(w)

我们可以进一步地把最后一个航点改为MAV_CMD_NAV_VTOL_TAKEOFF(85),垂起则会再最后一个航点自动切为旋翼并垂直降落,轨迹如下图所示。
    w = wayp0.setWaypoints(3,84,True,True,0.0,0.0,0.0,float('nan'),47.397713,8.547605,50)
    wps.append(w)

    w = wayp1.setWaypoints(3,16,False,True,0.0,0.0,0.0,float('nan'),47.398621,8.547745,50)
    wps.append(w)

    w = wayp2.setWaypoints(3,85,False,True,0.0,0.0,0.0,float('nan'),47.399151,8.545320,50)
    wps.append(w)


 3962
3962


 被折叠的 条评论
为什么被折叠?
被折叠的 条评论
为什么被折叠?
 到【灌水乐园】发言


